


Table of contents
Introduction
Productivity tools on Linux often include both a status line and a prompt. The function of a status line is to display important information relevant to the program’s current context, and a prompt identifies where a program is expecting some input from the user. Some good application examples that utilize these features include the Linux shell and Vim.
Integration of ZSH, Oh My Zsh and Powerlevel10 with Linux terminal
Installing ZSH shell
In this section, I will show you how to install the ZSH shell on Linux (Pop-os / Ubuntu) operating system and customise it with ohmyzsh framework and PowerLevel10K theme.
Search for zsh with your package manager, the below output is edited.
lab@pop-os:~$ apt search zsh
Sorting... Done
Full Text Search... Done
zsh/jammy,now 5.8.1-1 amd64
  shell with lots of features

zsh-antigen/jammy,jammy,now 2.2.3-5 all
  manage your zsh plugins

zsh-autosuggestions/jammy,jammy,now 0.7.0-1 all
  Fish-like fast/unobtrusive autosuggestions for zsh

zsh-common/jammy,jammy,now 5.8.1-1 all
  architecture independent files for Zsh

zsh-dev/jammy 5.8.1-1 amd64
  shell with lots of features (development files)

zsh-doc/jammy,jammy 5.8.1-1 all
  zsh documentation - info/HTML format

zsh-static/jammy 5.8.1-1 amd64
  shell with lots of features (static link)

zsh-syntax-highlighting/jammy,jammy,now 0.7.1-2 all
  Fish shell like syntax highlighting for zsh

zsh-theme-powerlevel9k/jammy,jammy,now 0.6.7-2 all
  powerlevel9k is a theme for zsh which uses powerline fonts
Install zsh and some Plugins for autosuggestion and syntax highlighting.
sudo apt install zsh zsh-syntax-highlighting zsh-autosuggestions zsh-antigen
Next, install Oh My Zsh.
Installing Oh My Zsh
Oh My Zsh is a delightful, open source, community-driven framework for managing your Zsh configuration. It comes bundled with thousands of helpful functions, helpers, plugins, and themes.
Oh My Zsh is installed by running one of the following commands in your terminal. You can install this via the command line with either curl or wget. When installed, it will auto configure the setup, asking some questions and that's it.
sh -c "$(curl -fsSL https://raw.github.com/ohmyzsh/ohmyzsh/master/tools/install.sh)"
or
sh -c "$(wget https://raw.github.com/ohmyzsh/ohmyzsh/master/tools/install.sh -O -)"
Download Plugins for autosuggestion and syntax highlighting.
git clone https://github.com/zsh-users/zsh-autosuggestions.git $ZSH/plugins/zsh-autosuggestions
git clone https://github.com/zsh-users/zsh-syntax-highlighting.git $ZSH/plugins/zsh-syntax-highlighting
Next, install the PowerLevel10k theme.
Install PowerLevel10K theme
We will clone the repository into the default theme folder, you may use a customized folder also.
git clone https://github.com/romkatv/powerlevel10k.git $ZSH/themes/powerlevel10k
To download font, see Manual font installation. It’s the best and works everywhere. For Linux (Ubuntu / Pop-os) you will need this font, otherwise, your terminal may not render clean status lines and prompts in zsh.
Now edit your ~/.zshrc file to use the PowerLevel10K theme, Awesome Patched font, Autocorrection, Autosuggestion and Syntax highlighting.
Enter the command in your terminal.
vim ~/.zshrc
Find these settings and replace them with the below configuration.
# Find the ZSH_THME and replace it with
ZSH_THEME="powerlevel10k/powerlevel10k"
# If you want to enable auto-correction, uncomment the line
ENABLE_CORRECTION="true"
# add plugins so scroll down a little till you find
plugins=(git zsh-autosuggestions zsh-syntax-highlighting)
# add red dot completion
COMPLETION_WAITING_DOTS="true"
# add path for theme
source ~/.oh-my-zsh/themes/powerlevel10k/powerlevel10k.zsh-theme
# To customize prompt, run `p10k configure` or edit ~/.p10k.zsh.
[[ ! -f ~/.p10k.zsh ]] || source ~/.p10k.zsh
source ~/.oh-my-zsh/themes/powerlevel10k/config
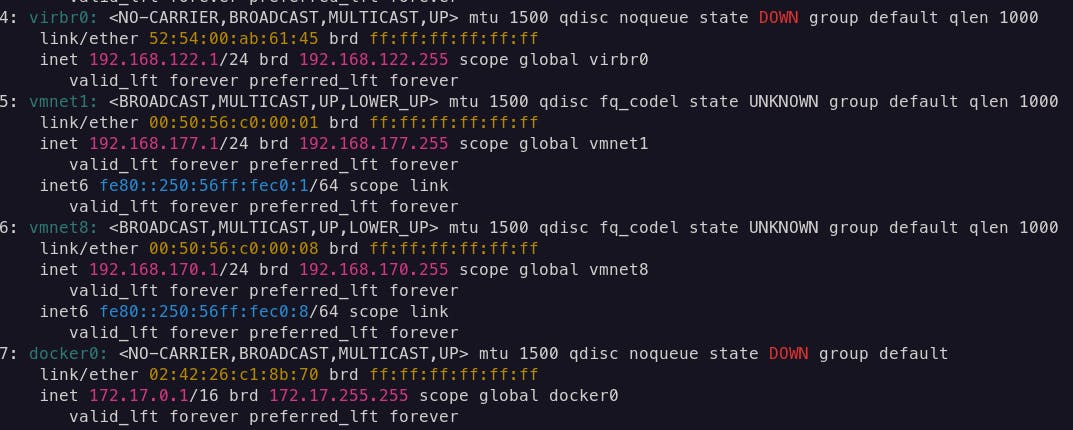
# colour output for IP cmd
alias ip='ip -c'
Screenshot after adding `alias ip='ip -c'
You will also have to go to the preferences of your terminal and change to the custom font which you installed.
Now the last step
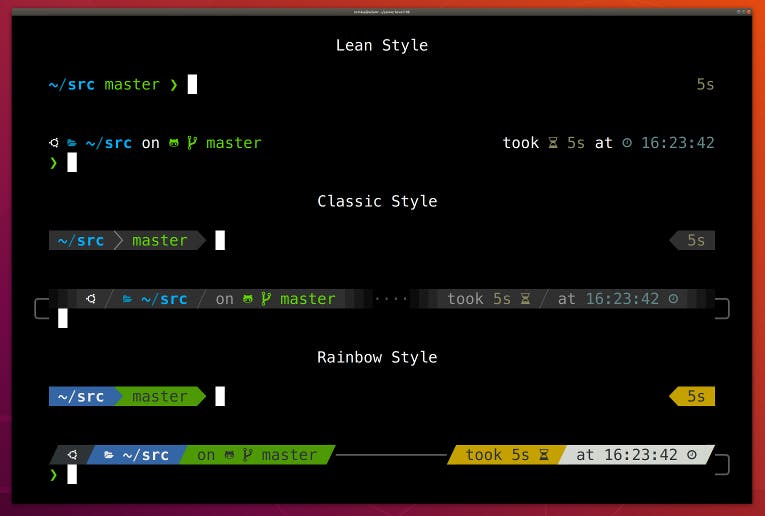
You will need to run the p10k configure command to set up your terminal looks. Just follow the steps which you see on the screen.
For other operating systems see this tutorial to customize it with ohmyzsh framework and PowerLevel10K theme.
Integration of Powerline with Vim
Powerline is a status line plugin for vim, and provides status lines and prompts for several other applications, including zsh, bash, fish, tmux, IPython, Awesome, i3 and Qtile.
Powerline is written in the Python programming language, which means that your system will need to have a recent version of Python and pip to run it.
Installing Powerline
In this section, we will install a powerline on Linux (Pop-os / Ubuntu) along with its dependencies and then go through how to integrate the powerline with the Vim text editor.
pip install powerline-status
Then confirm its install location on your file system using pip’s show command:
pip show powerline-status

# output
Name: powerline-status
Version: 2.7
Summary: The ultimate statusline/prompt utility.
Home-page: https://github.com/powerline/powerline
Author: Kim Silkebaekken
Author-email: kim.silkebaekken+vim@gmail.com
License: MIT
Location: /home/username/.local/lib/python3.10/site-packages
Requires:
Required-by:
Add your location directory to the PATH variable in ~/.zshrc:
vim ~/.zshrc

# add this line
export PATH="~/.local/bin:$PATH"
I recommend installing the i3ipc package even if you are not an i3 user because it might come in handy later. Invoke pip to Install these packages:
pip install psutil i3ipc
Using Powerline with Vim
Your version of Vim must have been compiled with Python for powerline to work. Run the following command to check the Python versions your Vim installation supports:
vim --version | grep +python

# Output
+python/dyn +python3/dyn
You are good to go if you see a line containing either +python or +python3, meaning that Vim supports Python3.
At this point, all we need to do is add some code to .vimrc to enable powerline:
# to set status line
set laststatus=2
python3 from powerline.vim import setup as powerline_setup
python3 powerline_setup()
python3 del powerline_setup
Close your terminal and again open the terminal or use source .vimrc to apply settings.


No other code is necessary to get the powerline working inside of Vim.
Setting Vim Color Schemes
Before you try a color scheme, make sure that syntax highlighting is turned on in Vim. That can be done by either saving syntax on in your 'vimrc' or by running :syntax on in an active Vim session.
To temporarily use a color scheme, use one of the following commands from Normal mode.
:colo <color-scheme-name>

:colors <color-scheme-name>

:colorscheme <color-scheme-name>
You tried a color scheme and want to make it permanent, append the following line in your '.vimrc' file.
colorscheme <color-scheme-name-here>
Installing third-party color schemes
There are two ways you can install a third-party color scheme.
Either you can use a plugin manager for Vim, or manually clone the repository to the right place.
When you visit the repository hosting color schemes, that repository will always contain a README. Make sure you read it thoroughly.
As mentioned above, most color schemes can be installed by using the plugin manager but some require different commands to install manually. I prefer manual installation, in this section, we will install Dracula dark theme for Vim.
These are the default instructions using Vim 8.2.
- Create the directory structure as below:
mkdir -p ~/.vim/pack/themes/start
Navigate to the start folder above:
Clone the repository using the "dracula" name:
git clone https://github.com/dracula/vim.git dracula
- Edit your .vimrc file with the following content:
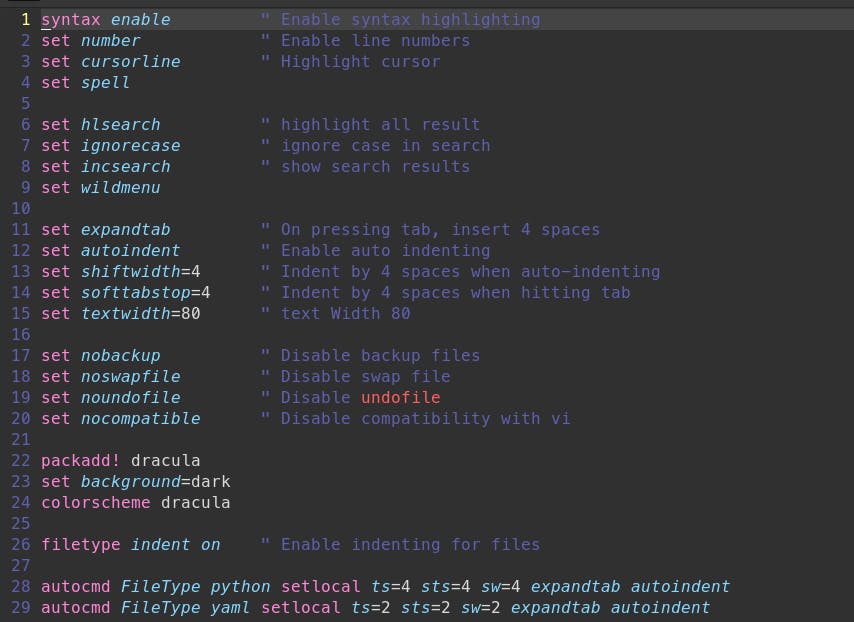
This section covered how you can use the default colour schemes and third-party colour schemes to enable either one of them.
Note: The same procedure is also worked for WSL2.